“Winter is a great time to be planning your renovations. Here are some great tips if you’re looking to upgrade your bathroom.”
Denise Buck & Ed Johnson – DC Metro Realty Team
“Winter is a great time to be planning your renovations. Here are some great tips if you’re looking to upgrade your bathroom.”
Denise Buck & Ed Johnson – DC Metro Realty Team
“If you’ve put up a ‘Live Tree’ you want it to last as long as possible, and you don’t want a ton a needles to clean up during and after Christmas. Read on for tips on how to care for your tree.”
Denise Buck & Ed Johnson – DC Metro Realty Team
“Now that the weather is turning colder be sure that you are ready before the winter freeze.”
Denise Buck & Ed Johnson – DC Metro Realty Team

Such as look for roof leaks before the first winter snow. Preventative maintenance is key. Read
Visit houselogic.com for more articles like this.
Copyright 2018 NATIONAL ASSOCIATION OF REALTORS®
“It’s probably finally too cool to leave the A/C on, but is it cool enough to turn on the heat? Read on to see what makes sense according the experts.”
Denise Buck & Ed Johnson – DC Metro Realty Team
Originally posted by American Home Shield
Turn on the heater or turn off the A/C? As summer becomes fall, temperatures fluctuate from hot to cold. Use these tips to keep heating and cooling costs in check!

Whether you choose to describe it as being “up and down” or as “running hot and cold,” as a homeowner, you know that autumn weather can be unpredictable. Autumn temperatures that veer between extremes can make keeping your home comfortable a real challenge. As the season’s warm days turn into cool nights, how do you avoid running back and forth to adjust your thermostat — or even switching back and forth between your air conditioning and heating systems? Here are some tips to help when switching from cooling to heating as the seasons change.
“Fall is almost here, so it’s time to get some fresh ideas for decorating. Change your mantel or other focal points for some new and interesting looks.”
Denise Buck & Ed Johnson – DC Metro Realty Team
“Not that long ago we wanted to freshen up the Kitchen. One of the first things we did very inexpensively was add cabinet and drawer hardware. A trip to the local hardware store and a few hours on a Saturday afternoon and we were done!”
Denise Buck & Ed Johnson – DC Metro Realty Team

Ditch the builder-grade hardware to get your own look Read
Visit houselogic.com for more articles like this.
Copyright 2018 NATIONAL ASSOCIATION OF REALTORS®
“Soon the weather will be cooling off and you’ll want to have a fire in the fireplace. But you haven’t used it in 6 to 8 months. Do you know what to check before you start using it again? Check out this article and you’ll be ready!”
Denise Buck & Ed Johnson – DC Metro Realty Team
Is your fireplace ready for fall and winter weather? Before temperatures drop, learn what to do to prepare it, regardless of what type of fireplace you have.

Unless you live in a state where spring and summer temperatures can be frigid, chances are your fireplace is not getting the attention it needs right now. You may have dusted the pictures on your mantle, cleaned the brick facing or even spruced up your fireplace with a clean, modern design. But let’s face it – during the warm months, it’s easy to forget about your home’s hearth.
Once temperatures begin to drop, however, the best way to use a fireplace is to let it get back to doing what it does best. And that’s warming your rooms, creating a cozy environment and providing toasty indoor comfort on a wintry night.
Whether you have a gas or wood-burning unit, the following fireplace tips and tricks can help you make sure your fireplace is ready to go well in advance of the change in seasons.
Proper fireplace maintenance is always essential. Keeping your chimneys clean and clear – including the flues, smoke chambers, dampers and vents – is the best way to ensure your fireplace is ready for immediate use once the first cold snap hits.
The National Fire Protection Association recommends all homeowners have professional chimney cleaning done annually and before you light the first fire of the season. If you live in a cold climate or use your fireplace more often than average, noted home maintenance experts recommend a good cleaning after every 60 to 80 fires.
Professional chimney cleaners will also perform the kind of detailed inspection that you may not have the time or tools to do on your own. Their work helps keep your fireplace chimney free of buildup or debris that can impair its most critical functions – channeling smoke, carbon monoxide and airborne ash away from your home.
A traditional wood-burning fireplace can be one of your home’s most attractive features. If you live in an older home, several wood-burning fireplaces may even be scattered throughout, warming and adding ambiance to different rooms.
While traditional fireplaces are generally safe, they also carry certain risks if not maintained properly. Before lighting the first fire of the season, be sure to check your fireplace for the following conditions.
A gas-burning fireplace is simpler to use and maintain than its wood-burning counterpart but also requires annual inspection and attention — especially if it has sat idle for some time. The Chimney Safety Institute of America reports that gas fireplace vent issues are common. These issues can prove deadly if they are not addressed. Carbon monoxide can enter the home when fireplace vents are blocked or do not operate as expected.
If you notice any of the following signs, your gas fireplace may not be venting properly.
If you suspect a vent issue, don’t use your fireplace until it can be inspected by a professional. Visual evidence of a problem could be a signal that carbon monoxide is building up inside the house, so take action quickly.
Some homeowners like the look, feel and sound of a fire, but view their fireplaces as more ornamental than functional. Other homeowners may rely on fireplaces for winter warmth and comfort. The best way to use a fireplace is mostly a matter of personal preference. If heating your home with a fireplace (or several) is a high priority, here are a few more fireplace tips and tricks to consider.
Not that you made the proper preparations, you should be ready to enjoy your fireplace. You should also be ready to read up on the other great pieces of advice available here on the “Home Matters” blog, such as how to build the perfect fire and how to give your fireplace an autumn makeover.
“Fall is right around the corner, so it’s time to start taking care of a few things around the house. Check out these great tips for preparing for the colder weather to come.
Denise Buck & Ed Johnson – DC Metro Realty Team
“We are constantly asked about what type of floors homeowners should put in their homes. The answer varies with where the floors are going, how they will be used and what your budget is. This article from Consumer Reports, might just help you make a decision in the future.”
Denise Buck & Ed Johnson – DC Metro Realty Team
Flooring takes up a lot of real estate in any room, and given its visual impact, you’ll want to make sure it lasts more than a few years. But when you consider all the flooring options on the market, it can be tough to know which material to go with.
“Is there potential for moisture or spills? How much traffic will the space have,” says Joan Muratore, a senior test engineer who evaluates flooring for Consumer Reports, “Ease of cleaning and maintenance is something else to consider.”
If you need help thinking through the functional aspects of flooring, check out our buying guide to the best types of flooring for each room. If you already have a sense of which material you’re looking for, well, you’re almost there: Take a look below at our top picks in five categories of materials, based on CR’s extensive lab testing.
We test wear resistance by subjecting a 6-by-6-inch sample of each flooring material to an abrasion machine fitted with a fine sandpaper disc, and assessing each sample for signs of visible wear after each cycle of sanding.
To test a floor’s resistance to denting, we drop a heavy, blunt weight that has the same impact as a large can of tomatoes, plus smaller, lighter, pointier objects that serve as proxies for kitchen utensils. Our testers drop the weights from progressively higher release points, examining the flooring for visible denting after each drop. The higher the drop before damage becomes evident, the better a floor’s dent-resistance rating.
We evaluate potential for fading by exposing part of a sample of flooring to UV rays for two weeks straight, then comparing the exposed portion to an unexposed portion. This gives us information on what can happen to a section of flooring that gets more sunlight than the rest of a room over time.
Powering It, Fixing It, Protecting It
That depends on whether the material can be installed as a floating floor, or whether it should be nailed or glued into place.
With a floating floor, the pieces click together to create one large puzzle that can be installed right over an existing floor; its own weight will keep it from shifting, and the walls hold it in place. It has the advantage of being relatively easy to remove, which comes in handy if you make a mistake while you’re laying the floor or if you want to change it out for something different in the years to come. (We indicate which flooring can float in our extensive ratings.)
This approach doesn’t work with solid wood and porcelain tile—both of which get attached directly to a subfloor. (Wood is either nailed or glued, and tile is set in a bed of mortar.)
Below are CR’s top-scoring options for engineered wood, laminate, linoleum, prefinished solid wood, porcelain tile, and vinyl flooring, plus a runner-up in each category.
For a full picture of what’s available in the five categories below, check our ratings of more than 70 flooring products.
This flooring consists of factory-finished planks and is available in a variety of wood species. It can survive more scuffs than unfinished hardwood but designwise still add lots of warmth and character. As a whole, this category doesn’t do well when it comes to dent resistence—many in our ratings earn a Poor.
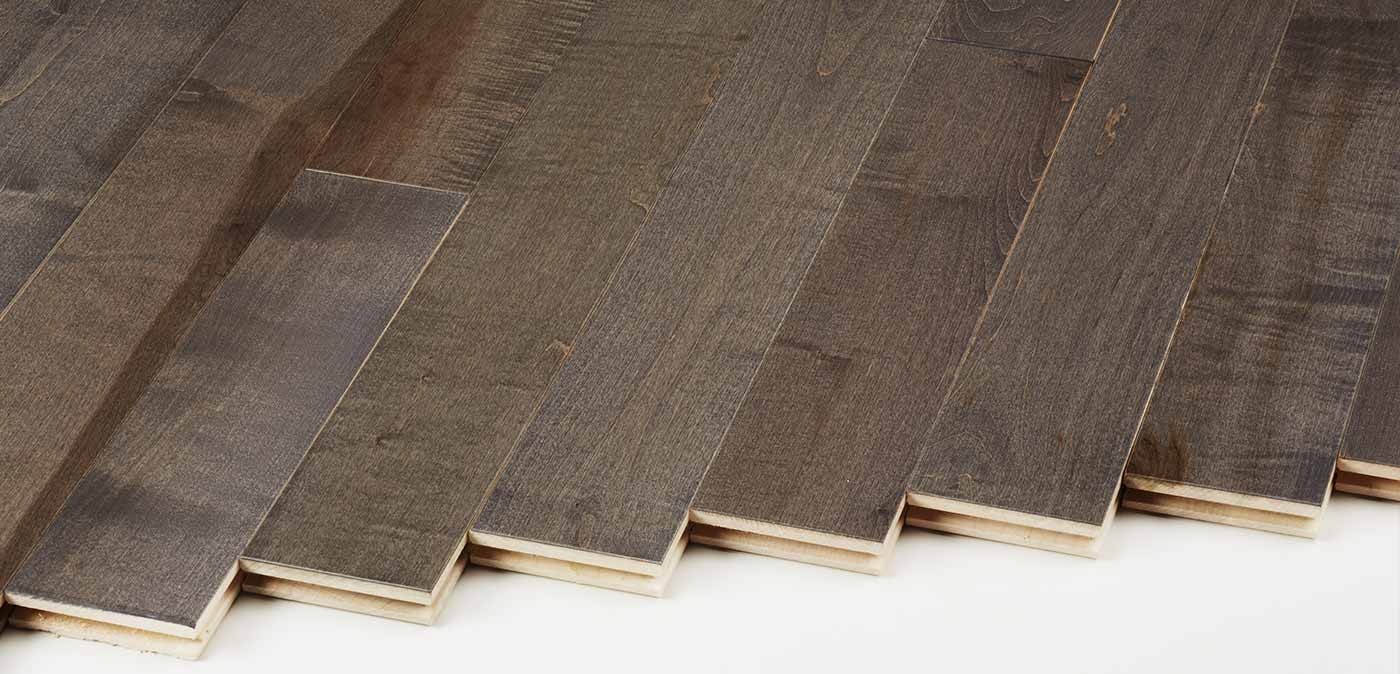
Best: Lumber Liquidators Builder’s Pride Select Pewter Gray Maple 10040807
Price per square foot: $4.20
CR’s take: For several years, this Lumber Liquidators option has won the top spot in our ratings of prefinished solid wood flooring. It earns a rating of Excellent for resisting foot traffic and scratches, and it costs less than other top models. This flooring can be nailed or glued into place, depending on the subfloor material.
Runner-up: Armstrong Paragon Original Ember SAKP59L401
Price per square foot: $7
CR’s take: This is the only other model in this category that receives an Excellent rating for ability to resist wear from foot traffic. This flooring also does well in retaining its color when exposed to ultraviolet rays; it won’t fade as much as others might in sunny rooms. As for installation, it needs to be nailed down to a plywood subfloor.
Made from several layers of plywood bound together by adhesives and topped with a layer of solid wood, this floor type simulates the look and feel of hardwood, but has one important advantage: The plywood substrate makes each plank less susceptible to seasonal shrinking and swelling than solid wood, which minimizes gaps between boards that can appear in dry conditions. (We have no runner-up in this category because none of the other products tested well enough for CR to recommend.)
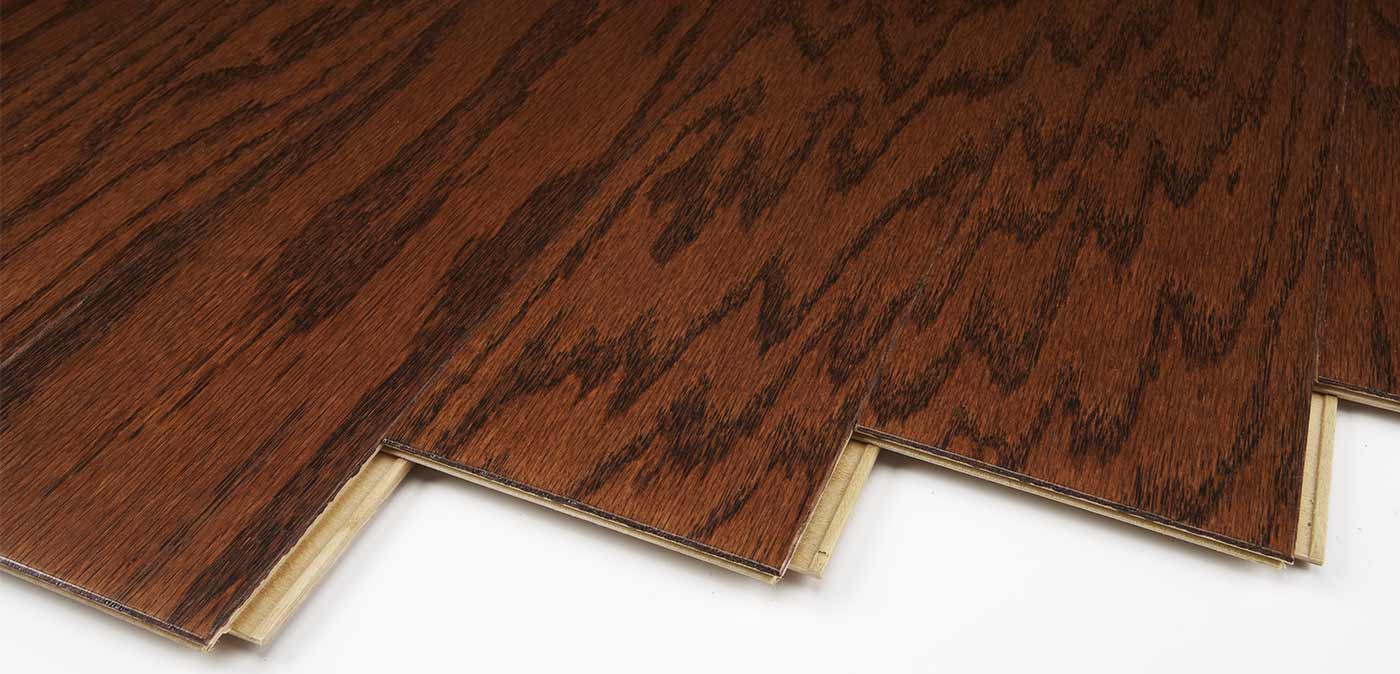
Best: Harris Wood Traditions SpringLoc Red Oak Bridle HE2505OK48
Price per square foot: $5.50
CR’s take: This engineered wood flooring can withstand the sun’s rays with the best of them, earning a rating of Excellent in our UV-resistance test. When challenged by foot traffic and denting, though, it earns a rating of only Fair, so it wouldn’t be a prudent choice for a high-traffic zone.
A less expensive option, laminate flooring simulates wood with a photographic image of wood sealed on top of dense fiberboard. Laminate comes in a variety of wood patterns, from oak to maple to pine. It’s usually easy to install because most products allow you to float the material over another flooring surface. That makes it ideal for quick upgrades.
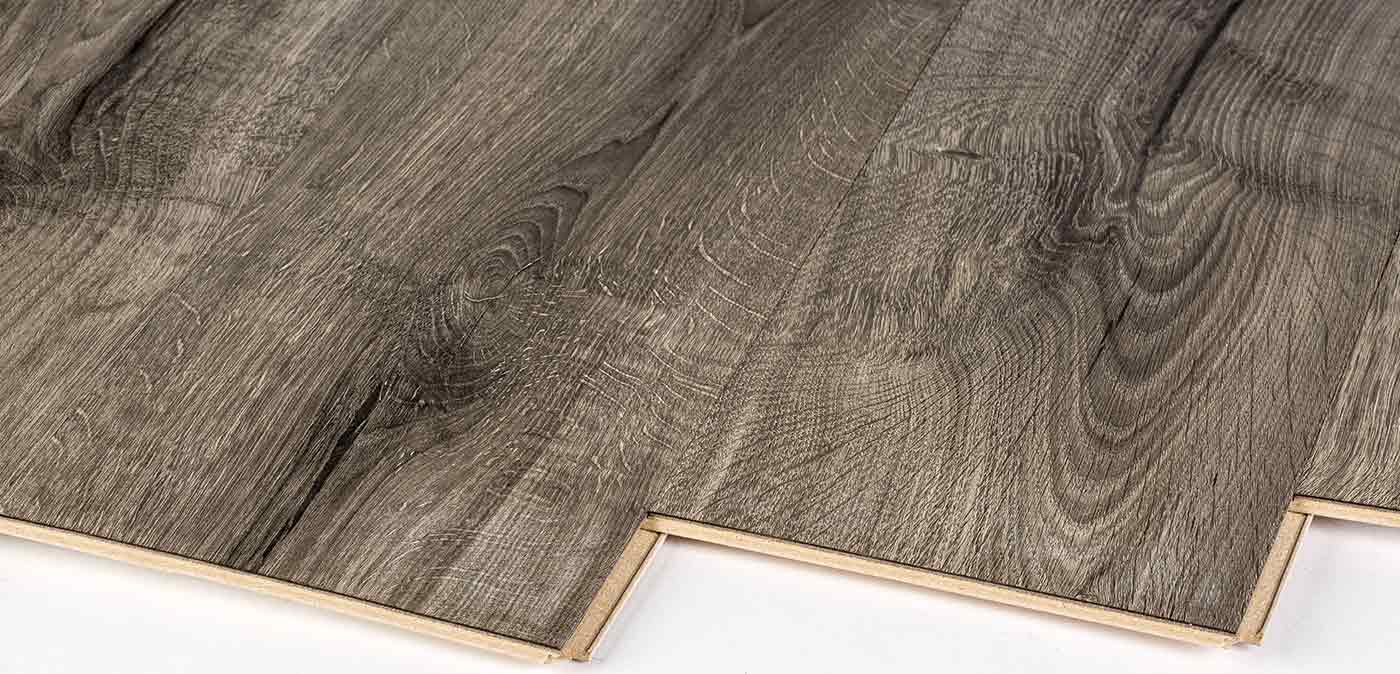
Best: Pergo Outlast+ Vintage Pewter Oak LF000848 (Home Depot)
Price per square foot: $3
CR’s take: Resistant to stains, scratches, and foot traffic, Pergo’s Outlast+ Vintage Pewter Oak earns impressive scores across all our tests. It has a lifetime warranty that promises the laminate surface will not wear through and that the floor won’t fade from exposure to sun or electrical lighting.
Runner-up: Home Legend Textured Oak Angona HL 1224 (Home Depot)
Price per square foot: $2.80
CR’s take: This flooring earns a rating of Excellent for its resistance to foot traffic and scratches in our tests, and holds up to prolonged UV exposure. It doesn’t stand up to dents very well, so it might not be best for kitchens, where there’s a chance you might drop a pot or pan.
Usually made of flexible PVC, vinyl flooring comes in squares or planks that can made into floating flooring or glued into place, or sheets that need to be glued down (by a pro). Vinyl flooring comes in hundreds of looks—woodlike, stonelike, and woven appearances, to name just a few.

Best: Armstrong Vivero D10 Homespun Harmony Rugged Brown U1042
Price per square foot: $4
CR’s take: This vinyl option, which comes in planks, performs well in all our tests. It resists foot traffic, scratches, stains, and dents. There really isn’t a negative to note. It’s also easy to install, allowing you the option of floating it over an existing floor or affixing it with adhesive.
Runner-up: Congoleum DuraCeramic Sierra Slate SI74 Golden Greige
Price per square foot: $5
CR’s take: For those interested in a vinyl floor with the look and feel of stone, the Congoleum DuraCeramic Sierra Slate SI74 Golden Greige is a good choice. It earns a rating of Excellent in our foot traffic and scratches tests. It doesn’t achieve the same high marks for dent resistance, so it might not be right for certain spaces.
A type of ceramic tile, porcelain tile can look like marble, stone, hardwood, or handmade tile. It easily resists foot traffic, scratches and stains, but porcelain can dent, crack or chip if hit by a heavy object. Be warned if you’re considering porcelain tile for your kitchen: It’s hard on your feet when you’re doing a lot of cooking, though you could consider using a cushioned mat to provide a bit of relief.
Best: Lumber Liquidators Avella Brazilian Cherry 10043950
Price per square foot: $3
CR’s take: With high marks across the board, this porcelain tile has the look of Brazilian hardwood without the high cost—which means you could have a wood-look floor in a bathroom or kitchen without worrying about moisture. Like most porcelain tile, this needs to be installed by a tile setter in a bed of mortar.
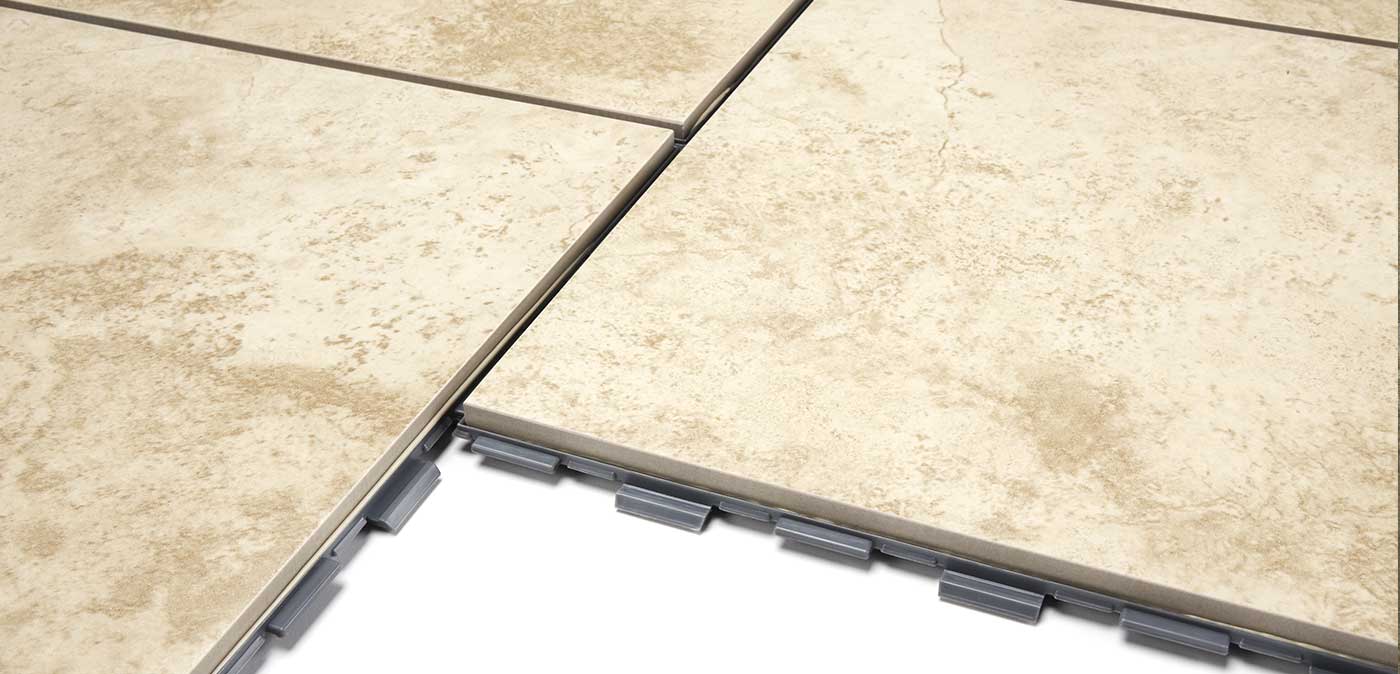
Runner-up: SnapStone Beige 11-001-02-01
Price per square foot: $8
CR’s take: Although most porcelain flooring calls for a subfloor (and pro installation), this runner-up from SnapStone happens to be DIY. You install it by joining each tile to the next with plastic tabs, then securing tiles with a proprietary flexible grout from the manufacturer. It earns a rating of Excellent for resistance to foot traffic and scratches, and doesn’t show much fading in CR’s UV tests.
“Ever struggled to get a picture actually hung on a nail? Well, here’s a much easier way to do it.”
Denise Buck & Ed Johnson – DC Metro Realty Team
Who among us hasn’t gotten totally fed up while hanging pictures on the wall? One of the most aggravating experiences in home decorating is when we’re hammering a nail into the wall only to have that nail push all the way in when we try to hook a photo or piece of artwork onto it. And don’t even get us started on trying to get the picture exactly straight: We need a small army of onlookers saying, “A little to the left!”
All in all, the whole process of hanging pictures can be utterly frustrating, leading many of us to either call in a professional or give up on the mission entirely. But the good news is that it doesn’t have to be this way, thanks to a fabulously simple picture-hanging trick making the rounds on the internet. The best part? This home-decorating hack uses a basic item that every single one of us has in our kitchen: a fork.
Here’s how it works: After you put the nail in the exact spot where you need your picture to go, all you need to do is stick the fork upside down, nestle the prongs on top of the nail, prop the picture onto the nail, and then gently pull the fork out of its place. It’s hard to believe, but people are using this trick to hang their pictures in a matter of seconds — and the final result is pretty darn impressive. Watch the magic home decor hack in the 10-second video below to see how the magic works:
Although we’ve heard quite a few great home decorating tips over the years, we have to say that we’re especially impressed with this one. As it turns out, the simple curve of the fork works so well for this annoying household task, taking care of the hardest part. Who knew that the secret to fabulous picture-hanging was hiding in our kitchen drawers all this time? Just think of how many great pictures we’ll be able to decorate our walls with now.